Ok, before I get started let me introduce you to my new favorite pen! How great is this guy?! I got him today. Doesn't he just make you want to smile? Everyone needs a pen that makes them giggle while signing all their money away during bill time. :)
Jealous of my new pen? Well, you can have one too! He is at the Dollar Tree where you'll be visiting to get the supplies you need to make my Dollar Tree magnet frame as seen in the tutorial below!!!
Grab your pen (hehe) and take notes!
Ok, so my buddy over at
Amanda's Parties to Go has a great new Valentines Day Collection out and it is a must have!! The minute I saw her
FREEBIE for Hershey kiss covers (check them out) I immediatly thought about bottle caps. Bottle caps are a great embellishment for hair bows, necklaces charms, embellish any craft, magnets...did someone say MAGNETS! I want to make some bottle cap magnets!
(I'm such a loser) So I did....
Then I needed something to do with all these silly magnets. So I made something else. A little magnetic frame/message board. I made it for a little over a couple dollars kids. You still with me? 
Step one: Go to the Dollar Tree and get yourself one of these fancy-smancy “silver” serving platters. I chose the square design. They have oval and rectangle. $1 I used Amanda’s Valentines Day collection for the paper background. 
 (immaturely giggling)
 Once the paint has dried (or before you paint) make yourself a template of the inside. It makes cutting the paper you’ll be using so much easier. Then, using your template as a guide, cut out your paper to fit on the inside of the platter.  It already looks cute!
 If you want to make your frame/message board a hanging one you’ll need to get a hammer and a screw driver and knock two holes in it to tie ribbon through.
And don’t be hatin’ on my hammer y'all! It may not be much to look at, but it does the job!!) ;) 
 I want mine to be a desktop frame/message board so I let the long ribbon fall to the back (incase I change my mind) and tied a pretty little ribbon for the front (I tied it first and then hot glued it on). Sit it on a little frame easel (another dollar store find). And look how precious. It needs just one more thing…
 I added a little “P” to personalize. (I found the P at Hobby Lobby...50 cent). The magnets are bottle caps. I got the bottle caps and covers here on etsy.
OR you can always get your bottle caps the fun, good old fashioned way. ;)
Either way, you need to paint them with spray paint (I used red and pink), used my one inch hole punch to punch out the insides (design from Amanda’s collection), glued them on the inside of the bottle caps and then put a bottle cap cover over the paper. Then I attached magnets (again, found at Hobby Lobby) to the back of the bottle caps. DONE!
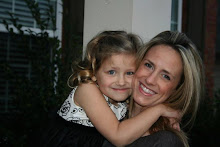
Doesn’t this make the cutest frame!?!  Wait! Pause! Bring it in a little closer. Look how sweet and precious that little baby is!?!? Whose children are those?! Oh wait, their mine. ;)
Except that sweet little baby is no longer a sweet little baby anymore. She is 2 going on 3 (in two months) and she is mean as a snake now! ;) (ok, not "mean" just really mischevious...the word hellraiser kinda comes to mind) But doesn’t she look so sweet and unassuming in this picture.
Ahhhh, memories.
By the way this is a 5 by 7 picture. Perfect size for this “frame”.
And don’t forget! This can be used as a message board too. Here it is hanging on my pantry door. Its always good to have a nice little reminder... 
Wouldn't it make a great Valentines Day present for your kids' teachers?! Whaaaaaat's up Mrs Phillips!!!?!?!?
I hope you're not reading this right now b/c this one's for you! ;)
(just kidding...it was going to be, but I have since come up with another idea for you)
It may be early, but at least its not late...here goes anyway... Happy Valentines Day!!!! 


 (immaturely giggling)
  It already looks cute!


You are the best and always make me laugh! Thanks, Kate, for a great tutorial. Now to copy your genius ways and put them on my blog.....
ReplyDeleteYippee!!! :)
ReplyDeleteKate! I love your ideas. I'm officially a fan and a follower of your site. Being a kindergarten teacher I'm going to use a modified version of this idea with my kids. Thanks and keep em coming!!! xoxo
ReplyDeleteApril :)
I love this idea! Would you be willing to link it up to my Valentine Link Party going on now? I'd love to have your amazing creativity! Thanks, Michelle http://michellepaige.blogspot.com/2012/01/rockin-valentine-valentine-link-party.html
ReplyDeleteOh, I'd love to have you link up your sweetheart cake pops too, they're adorable. I'm your newest follower.
Love your ideas...was thinking about making the magnets at a 5th grade valentine party. How long would you say it takes the glue to dry before you put the bottlecap cover over the paper? Thanks
ReplyDeleteThanks all!! Michelle, I just linked up. :)
ReplyDeleteAnd 3girlygirls, I just used a glue stick to glue the paper in the bottle cap and then stuck the cover on pretty much right away. lol I haven't seen any issues w/ not waiting yet. ;)
Thank you so much for linking up this idea! I SO want to make one just like yours! Thanks for the step-by-step directions!
ReplyDelete